- Home
- Mounting Deck Hardware
Mounting Deck Hardware
|
Having the right piece of hardware in the right spot can make your life on board simpler, safer and easier, as well as improve the value of your boat. All these aspects are important, how much so depends on your priorities. However, mounting hardware improperly can have just the opposite effects. For example: A poorly mounted stanchion base could rip from the deck dumping a crew member over. Depending on how well you like the crew this could be a good or bad thing. At the very least you would have to (should) go back for him and you'd have a gaping hole in your deck. I know many people that are afraid of cutting and drilling holes in there boat. If it's done right there is no problem. If it's done right it will probably be better that how the hardware was mounted on most production boats. Two things you have to consider: stress and leaks.
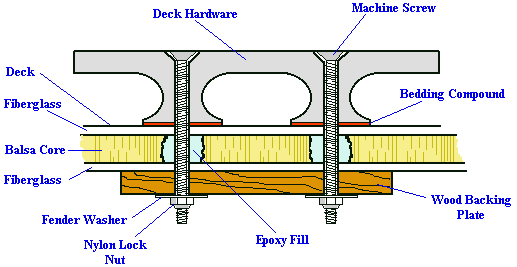
The above is a cross section illustrates the proper mounting of a cleat, the same principal would be used with any piece of hardware. Locate the hardware where you want it. Think about how you'll be using it and whether it might interfere with movement or other hardware. Mark the hole locations. Drill the holes, matched to the fasteners you are going to be using. If there is any stress at all on the hardware THROUGH BOLT IT! Self tapping screws are fine for hinges on cabinets, not for main sheet traveler blocks! Beleive it or not that is exactly what a friends' new H___ sailboat had. We jibbed his main and ripped the windward block right out... they're though bolted now. Use bolts or machine screws, depending on your hardware (see "The Proper Fastener" and then order from our Fastener Page). Most decks are a sandwich of fiberglass, balsa wood, and fiberglass. This is for wiegth savings while still being strong. However if water gets into the balsa core it rots the wood and delaminates the deck... not good. Therefore, after the holes are drilled I take a nail with the tip bent at a 90 degree angle and dig the balsa core out all around the hole. Then I tape the bottom of the of the hole and inject/pour epoxy into the hole 'til it's full. After the epoxy has cured re-drill the holes. (Hint: I sometimes stick birthday candles in the hole after the epoxy is in. They drill out easily and provide a pilot hole. If you're lucky, they are the same size as your your machine screws!). Next, cut out and drill a wood backing plate. This is your protection from stress (more ways than one). If you spread the forces pulling on your hardware over a wide enough area you don't have to worry about it pulling out. Therefore, make it big to cover as may square inches as possible. If you'll see the board in the cabin use a nice piece and finish it appropriately. If it's hidden, use scrap plywood or thin CCA and lock nuts. Now comes the mounting itself. Take the fasteners and make sure everything lines up: hardware, holes in deck, and backing plate. Then spread evenly, sufficent bedding/sealing compound on the base of the hardware. There are basically three types on the market today (unless you're the purest and still use, or can find, the old smelly "peanut butter" stuff I remember). They are: Silicones, Polysulfides, and Polyurethane. For most deck fittings the silicones should work fine for you (if you are using mechanical attachments with it), or may be the polysulfides if you more adhersion or are going to be painting. NO NOT use the polyurethane, someday you or someone else will want to get the piece of hardware off; it will never come off if you use polyurethane. For a complete discussion of these adhesive sealants click here. Bring it all together with your fasteners. Use fender washers and nylon lock nuts. If the fasteners are visible below decks use acorn (cap) nuts with lock washers instead of nylon lock nuts for looks and safety (no sharp edges). I usually draw it up firmly, but not really snugged down yet. Clean up the sealant that squashes out from under (see the ahesive sealant web page for clean up of the specific type you are using). After the sealant has cured go back and snug all the nuts up solid. If you draw it up too tight in the beginning all the sealant is sqeezed out from under. Doing it this way allows a gasket to form under the hardware. With a littletime and planning you'll have something you can depend on. |