- Home
- HAND CRIMP LIFE LINE TERMINALS
HAND CRIMP LIFE LINE TERMINALS
|
Hand crimping your life lines can save you a great deal of expense when you are replacing them. You can install them yourself in the water or in the yard with little effort and you can use your old ones for templates. With a little time to learn the procedure on the first one and care in measuring you'll end up with a professional looking job! If you are ready to purchase your fittings, go here to find all of our fittings. The following instructions is base on instructions that come with the Suncor Stainless life line fittings, that we carry. It is important to note that failure to follow these instructions or use the proper tools listed here will result in the premature pulling out of the cable from the terminals.
Tools Required For Installation:
1. Adjust all turnbuckles, pelican hooks and adjusters to 2/3 extended. 2. Strip vinyl cover back to expose bare wire per diagram "A". 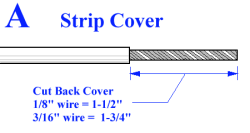
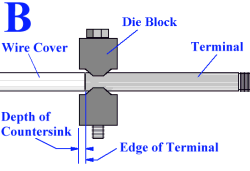
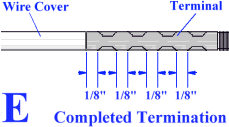
3. Place terminal into proper die: 4. Position the terminal in die as shown in diagram "B" for E0113-H001 . Tighten bolt or compress lever just enough to hold terminal. Use diagram "E" for E0113-0600 5. Insert cable into terminal, be sure vinyl cover is tight against terminal before proceeding with any crimping. (For Lever Tools skip to # 9 after completing # 5.)
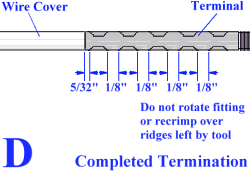
6. CRIMPING: (For Lever Tool, skip #’s 6, 7, & 8) For bolt tool, see diagrams "B", "C" & "D". Tighten the bolts alternately until die blocks are fully closed and no space can be seen between them. 7. Loosen the bolts until terminal can be repositioned for next crimp. 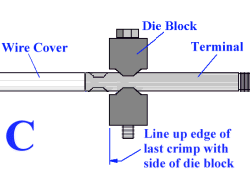 8. Position terminal as shown in "C" and repeat steps 6 & 7 until a total of five (5) crimps have been completed. The completed terminal should appear as shown in diagram "D".
9. For lever tool, see diagram "E". Make your first crimp 1/8” from the end of terminal. Make a total of three (3) crimps 1/8” apart. The completed terminal should appear as shown in diagram "E".
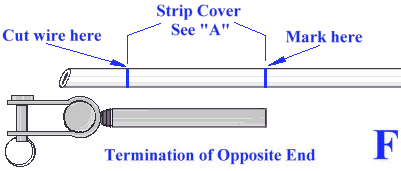
10. Attach completed terminal at required position and lead cable through stanchion eyes. Attach next terminal to be crimped at required position and while holding cable taut, mark cable as shown in diagram "F".
11. Repeat steps 2-8 (or 9) depending on tool used. * * * * * * * * * * * While 1/8" terminals are available, 1/8” cable can be used with 3/16” terminals by first installing an adapter sleeve into terminal (call or drop us a note for info). Follow instructions for 3/16” terminals. Hand Crimp terminals when properly installed will withstand the following straight pull loads: 1/8” terminals – 1200 lbs (545 kg) 3/16” terminals – 2500 (1135 kg), or 65-70% of 7x7 wire strength. While these loads have proven adequate for life lines,
DO NOT USE THESE TERMINALS FOR
How to check your crimping:
|

