
- Home
- COVERING YOUR BOAT
COVERING YOUR BOAT
|
For those of you who don�t want to invest in the expense and waste of shrink wrap each year, a blue tarp is your best bet. You can usually get one of these tarps for about one-fourth to one-third of what you would pay to have your boat shrink wrapped. With the proper installation you can get three years out of it. The secret behind extending the life of the tarp, and protecting your boat, is to reduce chafe. Reducing chafe requires the elimination of wear points and a snug fit. A good frame over the boat will accomplish both of these. This frame is inexpensive and easy to erect. After the first year,
when there is some cutting and drilling required, the frame can go up in
less than half an hour. Here�s what you�ll need:
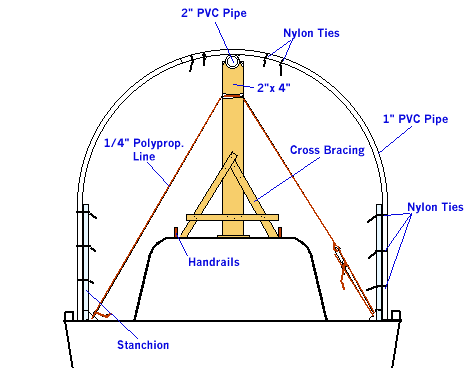 
Next, attach the 1� pipes to the outside of the stanchions to form the cross supports. Take the pipes on the stanchion opposite one another and bend them over and join them in the center. Secure it tightly with several nylon ties. I usually wrap the ends with duct tape to hold the ends under the opposite pipe. Secure to the 2� center pipe with nylon ties. Always make sure the ties are facing in so that there is no opportunity to chafe. Once all the framing is in place, look for every location where there may be a sharp edge or a point that may poke into the tarp and chafe. Wrap these with a bundle of rags. You can hold them in place with duct tape. It is wise to keep the tape on just the rags as the adhesive is a bear to get off your boat. After all your framing is padded you are ready for your tarp. Spread the tarp evenly over the framework and boat. Start in the middle and draw up tight. Using a loop of bungee (shock) cord on each tarp grommet and tying to these allows for a snug fit and keeps it snug (important for continued life). I usually leave it a bit open on the end to allow for ventilation. Keep drawing up tight all around. Never tie to jack stands! Wind can get under the tarp and pull the jack stands out from under the boat. Kind of like pulling the rug out. Always tie under the boat. Use bungee cords to tie to; they�ll keep your cover snug.
|
